[https://www.digitalocean.com/community/tutorials/initial-server-setup-with-ubuntu-18-04](https://www.digitalocean.com/community/tutorials/initial-server-setup-with-ubuntu-18-04)
#### Step 1 – Installing Nginx You can install it using the apt packaging system. Update your local package index: ``` sudo apt update ``` ``` sudo apt install nginx ``` #### Step 2 – Adjusting the Firewall ``` sudo ufw app list ``` ``` Output Available applications: Nginx Full Nginx HTTP Nginx HTTPS OpenSSH ``` permitting traffic on port 80 : ``` sudo ufw allow 'Nginx HTTP' ``` Verify the change: ``` Output Status: active To Action From -- ------ ---- OpenSSH ALLOW Anywhere Nginx HTTP ALLOW Anywhere OpenSSH (v6) ALLOW Anywhere (v6) Nginx HTTP (v6) ALLOW Anywhere (v6) ``` #### Step 3 – Checking your Web Server ``` systemctl status nginx ``` Finally access your website using your localIP address. ``` http://your_server_ip ``` You should see the default Nginx landing page: #### Conclusion Now you have installed Ngix server on your Ubuntu. Now you can do the following steps. 1. Server Blocking which I will explain in other chapter. 2. Install Letsencrypt for Https Access. 3. Use this as reverse proxy for your existing webservice such as flask etc.. 4. Host your website in Ngix. # Nginx with Let's Encrypt #### Introduction In this tutorial we will discuss about installing certbot on ubuntu to install Let's Encrypt SSL on to your ubuntu server. #### Prerequisites Before we start you need to make sure you have followings: 1. Your own domain for example ( [www.example.com)](http://www.example.com) 2. DNS management credentials. 3. Update A records in DNS, your A records should look like below. 1. A --- > [www.example.com](http://www.example.com) ---> 103.x.x.x (your public IP) 2. A --- > example.com ---> 103.x.x.x (your public IP) Let's Encrypt can be installed for the subdomain to. I have personally tried that and it was working fine. In case you want to do it for subdomain your A records should look like below. 1. 1. A ---> subdomain.example.com --- > 103.x.x.x (your public IP) #### Step 1 — Installing Certbot We will be using Certbot to install Let's Encrypt, Lets start by adding the repository. First, add the repository: ``` sudo add-apt-repository ppa:certbot/certbot ``` Install Certbot’s Nginx package with `apt`: ``` sudo apt install python-certbot-nginx ``` Now Certbot is ready, before we proceed we need to do some configuration on Nginx server default file. Open the Nginx default website file. ``` sudo nano /etc/nginx/sites-available/default ``` # Flask Docker Image #### Introduction Please note use lowercase for all the folder names. In my case I have created a folder "DOCKER" on my folder where all my docker images will be created. > Go to **/home/snk/dockers/** > > Create a directory with the application name for example **allclaims** > > Place **\*.py** , **Dockerfile** and Requirement.txt #### Step 1 - Stop Docker Container (If Any) ``` docker container ps ``` Take the correct container id and stop it ``` docker container stop Name_of_the_container ``` Remove the container ``` docker container rm Name_of_the_container ``` Build the container using container build command ``` docker build -t name_of_the_image:latest . ``` Run the container & expose port to use it in the Nginx reverse proxy. ``` docker run -it -d -p 5000:5000 name_of_the_image ``` #### Step 2 - Proxy pass in Nginx server Use the default site file, in case if you don't use the server blocking, else use the respective server file in Nginx server. ``` sudo nano /etc/nginx/sites-available/default ``` Add the location with application name and its corresponding dockers port and path as shown bellow. ``` location /allclaims/ { proxy_pass http://103.4.6.220:5000/; } ``` Restart the Nginx server to changes to reflect. ``` sudo systemctl reload nginx ```Information
> Most of the time when you run docker images inside the proxy you might end up with improper CSS or site load, in that case always use environment variable of APP\_URL, check each application for more information on the same > > Example while running the docker use the following command along with run statement. > > " -e APP\_URL=https://docker2.auto-boxe.com/book " # Reverse Proxy For Window Server To do reserve proxy for window server we need to do the following steps. Create a website, in our case it is STAGE, with in the stage we created Application called Jaya-stage. Please note that this application name is very important we need to create reverse proxy with the same name in Nginx server in ubuntu. [](https://docker2.auto-boxe.com/book/uploads/images/gallery/2021-04/image-1619422827033.png) Next step to create a reverse proxy configuration on Nginx server as shown below. [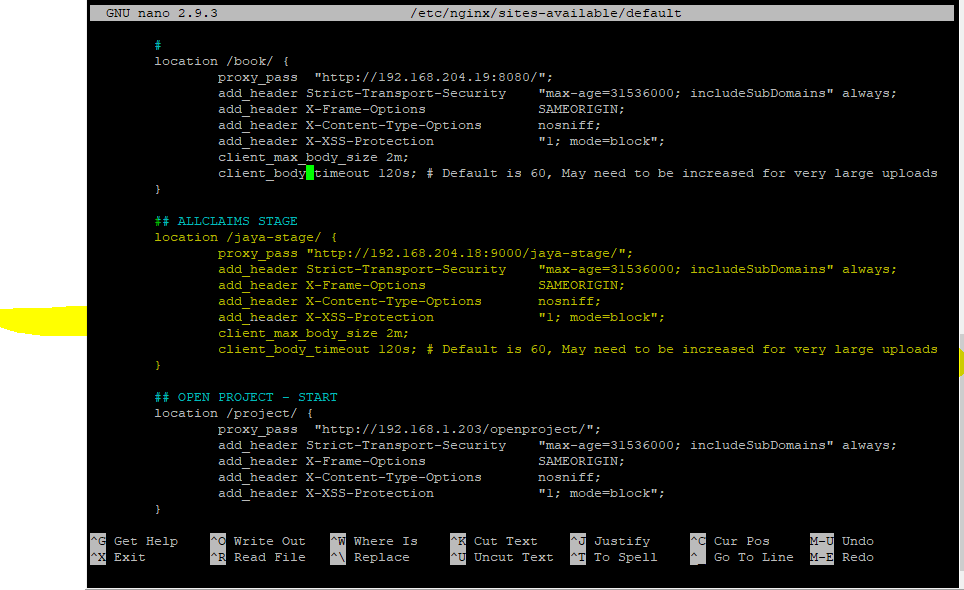](https://docker2.auto-boxe.com/book/uploads/images/gallery/2021-04/image-1619423005829.png) ``` ## ALLCLAIMS STAGElocation /jaya-stage/ { proxy_pass "http://192.168.204.18:9000/jaya-stage/"; add_header Strict-Transport-Security "max-age=31536000; includeSubDomains" always; add_header X-Frame-Options SAMEORIGIN; add_header X-Content-Type-Options nosniff; add_header X-XSS-Protection "1; mode=block";c lient_max_body_size 2m;client_body_timeout 120s; # Default is 60, May need to be increased for very large uploads } ``` https://docker2.auto-boxe.com/jaya-stage/ # Jenkins ## Introduction On this method we have created a Node on the stage or production server where we need our code to get deployed (Windows). This is basically to avoid using FTP or SFTP for code deployment as it might take more time and also we need credentials and FTP servers for the deployment ##### Step 1 - Create a Freestyle project ( Please refer Jenkins for creating different project type ) [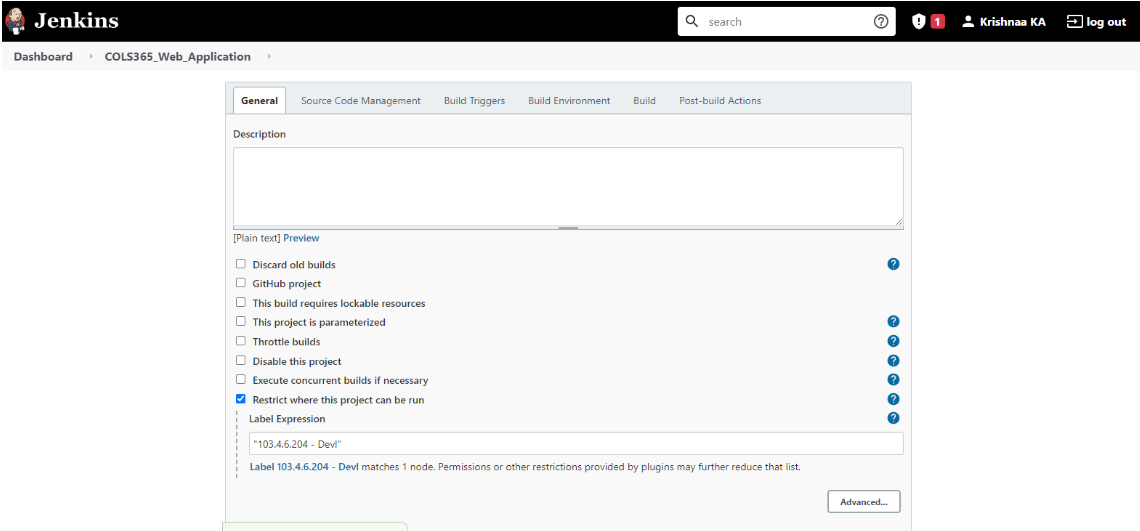](https://docker2.auto-boxe.com/book/uploads/images/gallery/2021-04/image-1618390324249.png) ##### Step 2 - SVN or GIT connection as per your requirement. [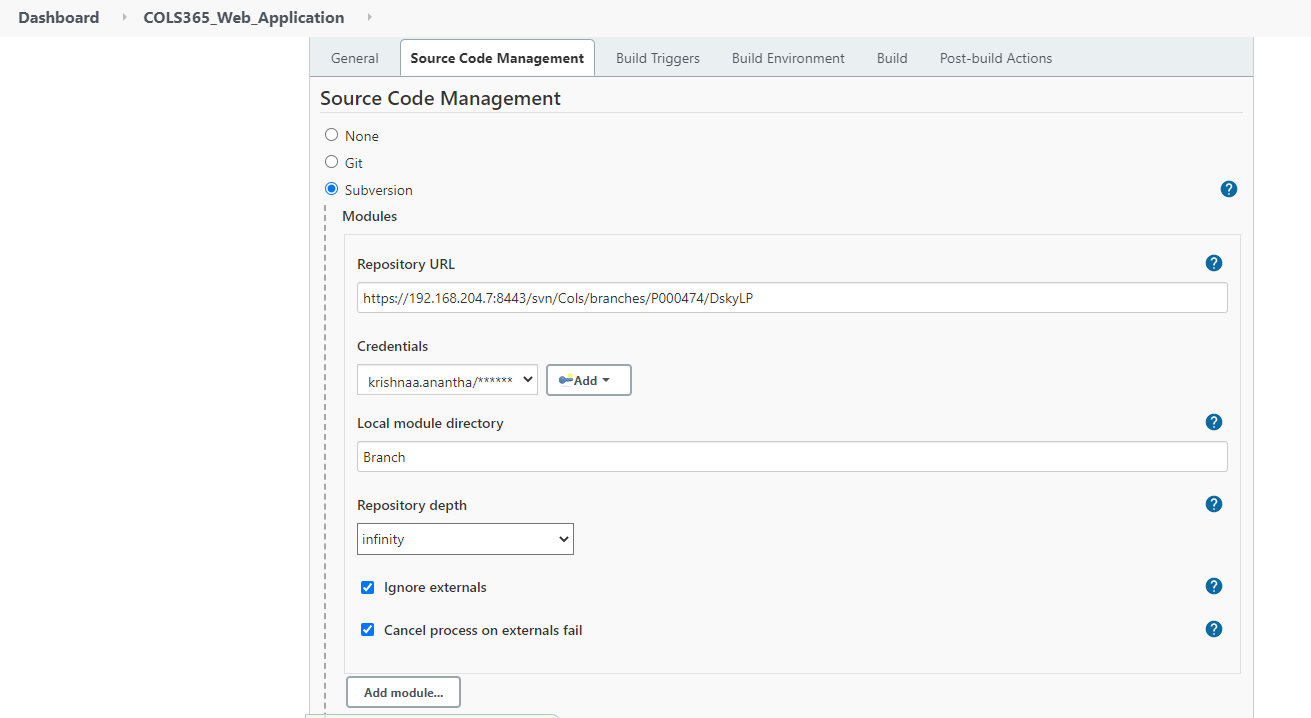](https://docker2.auto-boxe.com/book/uploads/images/gallery/2021-04/image-1618390333958.png)You got to install Visual Studio Build on the respective Node Server for us to create the Build Step. Use Visual Studio community version.
##### Step 3 - Build. [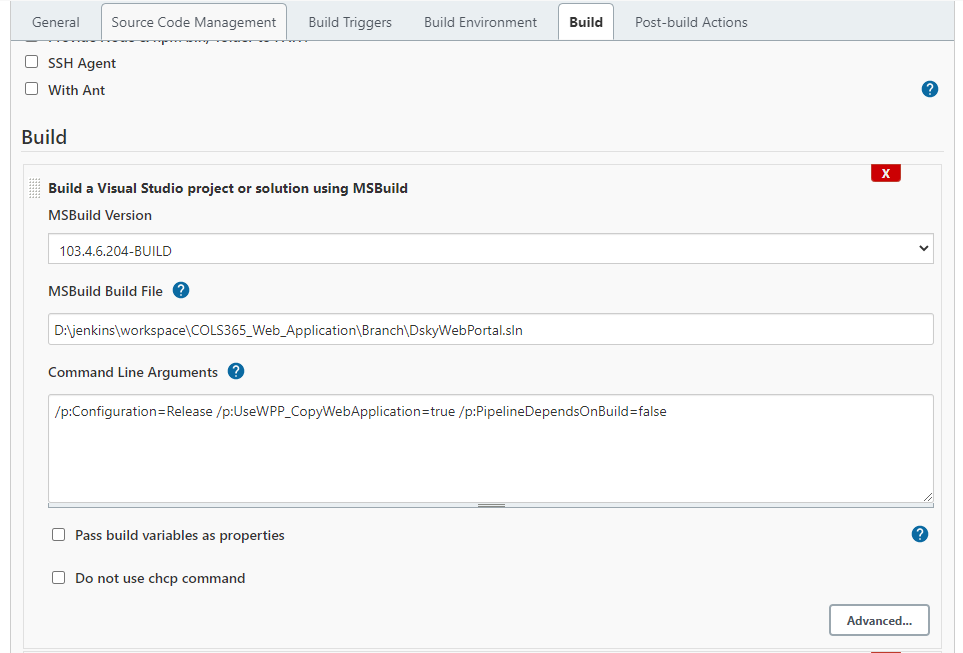](https://docker2.auto-boxe.com/book/uploads/images/gallery/2021-04/image-1618390341916.png) ##### Step 4 - ROBOCOPY or Deploy the code to the IIS. ``` set SOURCE=D:\jenkins\workspace\COLS365_Web_Application\Branch\DskyWebPortal\ set DESTINATION=C:\Hostingdata\DEVL\ColsWebPortal set EXCLUDEFOLDER="D:\jenkins\workspace\COLS365_Web_Application\Branch\DskyWebPortal\fileupload" robocopy /XO /E /Z /ZB /R:5 /W:5 /TBD /NP /MT:64 %SOURCE% %DESTINATION% /XD %EXCLUDEFOLDER% *. /XA:SH /XF *.CONFIG *.config *.svn-base @echo robocopy exit code: %ERRORLEVEL% @if %ERRORLEVEL% GTR 3 ( echo robocopy ERROR ) @if %ERRORLEVEL% GTR 3 ( exit %ERRORLEVEL% ) @set ERRORLEVEL=0 ``` # Jenkins-Adding Ubuntu Agent ``` sudo mkdir -p /usr/local/jenkin-service ``` ``` sudo chown admin /usr/local/jenkin-service ``` ``` cd /usr/local/jenkin-service ``` Execute the curl command from the Jenkins -- below is the example only ``` curl -sO https://jenkins.issentialsolutions.com/jnlpJars/agent.jar ``` ``` nano start-agent.sh ``` ``` #1/bin/bash cd /usr/local/jenkin-service curl -sO https://jenkins.issentialsolutions.com/jnlpJars/agent.jar java -jar agent.jar -url https://jenkins.issentialsolutions.com/ -secret 23569a2d25d3cf47de3950ea382db7f448d3f15e417cbf10562a1abf91f72453 -name "IS-IVH1-Ubuntu" -webSocket -workDir "/home/jenkins" exit 0 ``` ``` chmod +x start-agent.sh ``` Create an another file jenkin-agent.service ``` nano /etc/systemd/system/jenkin-agent.service ``` ``` [unit] Description=Jenkin Agent [Service] User=admin WorkingDirectory=/home/jenkins ExecStart=/bin/bash /usr/local/jenkin-service/start-agent.sh Restart=alwalys [Install] WantedBy=multi-user.target ``` ``` sudo systemctl enable jenkin-agent.service ``` Before Enabling the agent, Install the Java ``` sudo apt install software-properties-common apt-transport-https -y