# Open Source
# FluentD - Log
# FluentD v2.0
## **Installation Procedure**
#### **Code**
[FluentD.zip](https://docu.issentialsolutions.com/attachments/5)
```
docker compose up -d
```
**Reference**
```
https://www.digitalocean.com/community/tutorials/how-to-set-up-an-elasticsearch-fluentd-and-kibana-efk-logging-stack-on-kubernetes
```
####
```
pip install fluent-logger
```
```
from fluent import sender
from fluent import event
```
#### **Function to call and Insert Record in to FluentD**
```
#Error Log for fluent
@app.route('/ApplicationErrorLog', methods=['GET', 'POST'])
def ApplicationErrorLog():
try:
req_data = request.get_json()
serrortype = req_data['serrortype']
sprogram = req_data['sprogram']
sfnname = req_data['sfnname']
smsg = req_data['smsg']
sAppicationName = req_data['sAppicationName']
if(DBKEY == "PROD"):
sender.setup(sAppicationName, host='192.168.50.36', port=24224)
event.Event('PROD', {
'error_Type': serrortype,
'program': sprogram,
'function name': sfnname,
'error message': smsg
})
return "PROD"
else:
sender.setup(sAppicationName, host='192.168.50.36', port=24224)
event.Event('DEVL', {
'error_Type': serrortype,
'program': sprogram,
'function name': sfnname,
'error message': smsg
})
return "DEVL"
except :
#raise werkzeug.exceptions.HTTPException("Error: %s" % str("ERROR") )
errmsg = str(sys.exc_info()[1]) + ' Line: ' + str(sys.exc_info()[2].tb_lineno)
print(errmsg)
raise
return errmsg
```
```
docker build -t fluentdapp:latest .
```
```
docker run -it -d -p5015:5015 --name name_flientd fluentdapp –restart always
```
##### **Scope of the project.**
1. Run the EFK using docker compose.
2. Run the middle ware and make sure it connects with EFK
3. Create Sample Index in elastic search.
4. Integrate Copy LE and Delete LE functionality with EFK.
# FluentD v1.0
## Introduction
FluentD is the centralized Log collector and format that in to standard format and send it to elastic search & kibana for visualization.
### Video URL for introduction
```
https://www.youtube.com/watch?v=5ofsNyHZwWE
```
### Installation ( EFK stack using Docker and kubernet )
```
https://www.youtube.com/watch?v=MNId4HG0wV8
```
#### EFK ( Elastic Search / Kibana / FluentD )
```
https://github.com/justmeandopensource/elk/tree/master/docker-efk
```
#### EFK ( Elastic Serach / Kibana / FluentD / http )
```
https://www.youtube.com/watch?v=Gp0-7oVOtPw
```
# Telegram
# Create Chat Bot For An Application.
In the tbl\_application we need to update Telegram chatbot Token ID.
To create a Chat bot
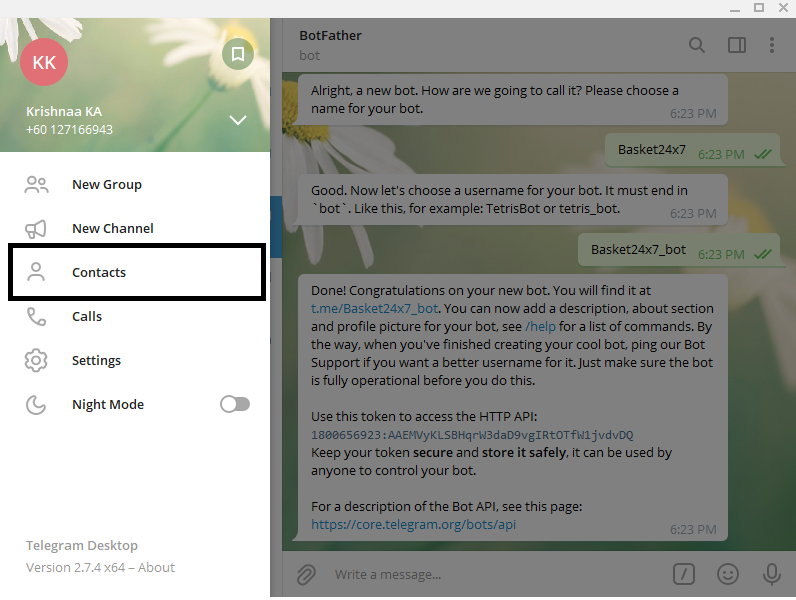
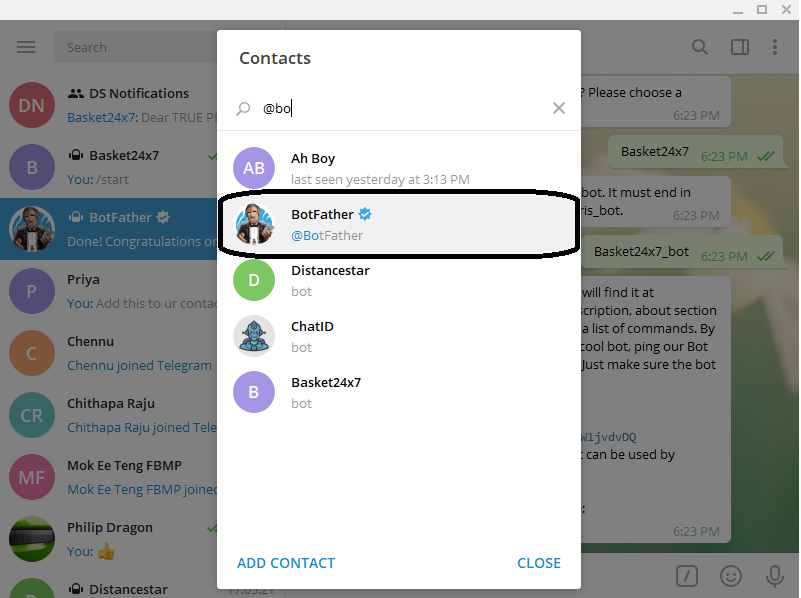
Step 1 : Add the BotFather to your chat account
[](https://docker2.auto-boxe.com/book/uploads/images/gallery/2021-05/image-1622085784659.png)
[](https://docker2.auto-boxe.com/book/uploads/images/gallery/2021-05/image-1622085827046.png)
[](https://docker2.auto-boxe.com/book/uploads/images/gallery/2021-05/image-1622085940389.png)
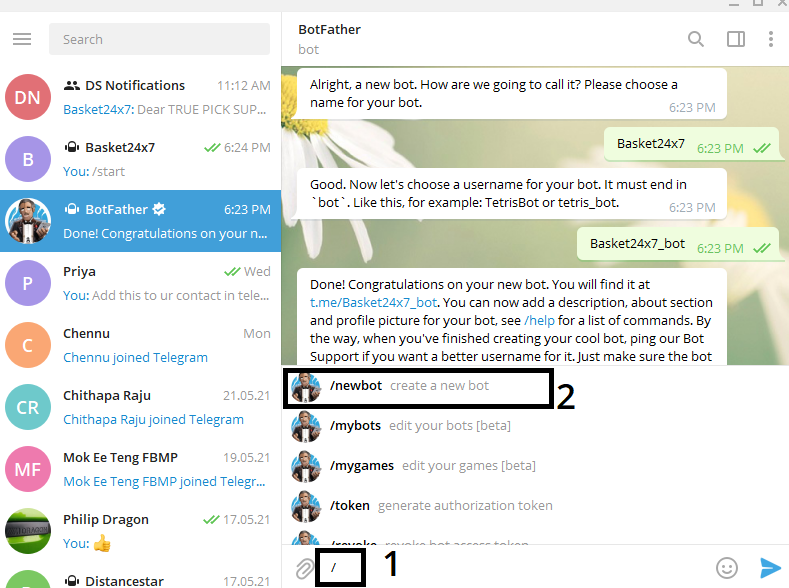
Follow the instruction to create a bot.
[](https://docker2.auto-boxe.com/book/uploads/images/gallery/2021-05/image-1622086015197.png)
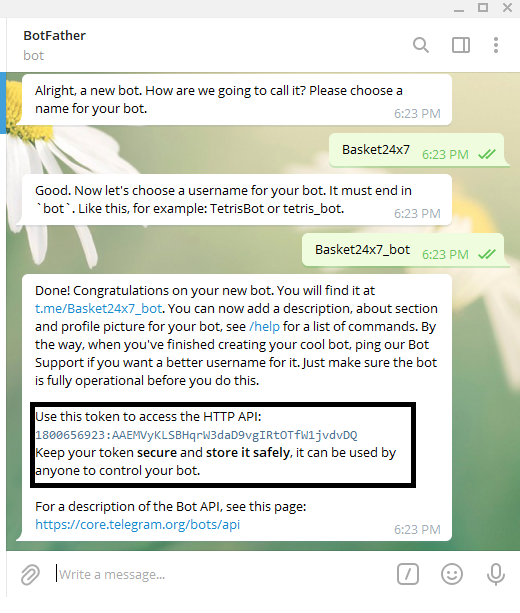
Use this token ID and update the tbl\_application table in SSO on the respective Telegramchatbot field.
# Update Member Chat ID and Company Chat ID
To update member chat ID in the member table of the application.
Click below link to get the member chat ID and update update the number in member table of the respective application thru screen or database update.
[https://telegram.me/cid\_bot](https://telegram.me/cid_bot)
To start receive message from the respective application member have to first accept the bot in to their contacts else member will not receive message from the bot. this is for security reason when working with bot.
For example if user wish to receive message from basket then click following link and click **start**
[https://telegram.me/basket24x7\_bot](https://telegram.me/basket24x7_bot)
# Solr
# Solr Installation in Linux
##### Application URL : **[http://192.168.1.208:8983/solr](http://192.168.1.208:8983/solr)**
**User Name : administrator**
#### **Installing process.**
cd ~/
**[wget ](https://downloads.apache.org/lucene/solr/8.9.0/solr-8.9.0.tgz)[https://downloads.apache.org/lucene/solr/8.9.0/solr-8.9.0.tgz](https://downloads.apache.org/lucene/solr/8.9.0/solr-8.9.0.tgz)**
**[wget ](https://downloads.apache.org/lucene/solr/8.9.0/solr-8.9.0.tgz)[https://downloads.apache.org/lucene/solr/8.9.0/solr-8.9.0.tgz](https://downloads.apache.org/lucene/solr/8.9.0/solr-8.9.0.tgz).asc**
**wget [https://downloads.apache.org/lucene/solr/8.9.0/solr-8.9.0.tgz.sha512](https://downloads.apache.org/lucene/solr/8.9.0/solr-8.9.0.tgz.sha512)**
**install**
**tar zxf solr-8.9.0.tgz**
**cd ~/solr-8.9.0/bin**
**sudo ./install\_solr\_service.sh ~/solr-8.9.0.tgz**
```
sudo systemctl stop solr
sudo systemctl start solr
sudo systemctl status solr
```
```
sudo systemctl enable solr
sudo systemctl restart solr
sudo systemctl status solr
```
Creating the first core
```
su - solr -c "/opt/solr-8.9.0/bin/solr create -c testcol1 -n data_driven_schema_configs"
```
stop the solr
```
systemctl stop solr
```
```
sudo su
```
```
sudo chmod -R 777 /var/solr/
```
```
sudo chmod -R 777 /opt/solr/
```
#### use the Core ftp to upload mysql jdbc drive to **/opt/solr/dist**
#### DATA OF CORES
All the data resides in **/var/solr/data/YOURCORE/conf**
go to the respective core and follow the steps
```
systemctl stop solr
```
1\. Create file db-data-config.xml
```
```
Edit Managed Schema and add the fields that you want to load at the end of the file before **</schema>**
```
```
Edit solrconfig.xml add at the bottom
```
db-data-config.xml
```
```
systemctl start solr
```
# Solr Installation and make it as Window service
#### Check Solr Status
```
E:\Solr\solr-8.8.2>bin\solr.cmd status
```
#### Start Solr
```
E:\Solr\solr-8.8.2>bin\solr.cmd start
```
#### Import Data From CSV
```
E:\Solr\solr-8.8.2>java -jar -Dc=barcode -Dauto example\exampledocs\post.jar example\exampledocs\product1.csv
```
> \*\*\*\*\*\*\*\*\*\*\*\*\*\*\*\*\*\*\*\*\*\*\*\*IMP Links\*\*\*\*\*\*\*\*\*\*\*\*\*\*\*\*\*\*\*\*\*
> https://solr.apache.org/guide/6\_6/post-tool.html
>
> https://www.progress.com/tutorials/jdbc/import-sql-server-data-into-apache-solr-using-data-import-handler-via-jdbc#:~:text=Importing%20the%20Data,-Start%20Apache%20Solr&text=Go%20to%20browser%20and%20open,a%20view%20as%20shown%20below.
>
> https://www.cdata.com/kb/tech/mysql-jdbc-apache-solr.rst
>
> [http://localhost:8983/solr/demo/select?facet=true&f.price.facet.range.start=0&f.price.facet.range.end=10&f.price.facet.range.gap=1&facet.range=price&q=\*:\*](http://localhost:8983/solr/demo/select?facet=true&f.price.facet.range.start=0&f.price.facet.range.end=10&f.price.facet.range.gap=1&facet.range=price&q=*:*)
## Install Solr as service in Windows
I took the article from following link all credit goes to author of this article, I have personally tried to run this on window server 2019 and we achieved what we want in no time.
[https://norconex.com/how-to-run-solr5-as-a-service-on-windows/](https://norconex.com/how-to-run-solr5-as-a-service-on-windows/)
[https://nssm.cc/download](https://nssm.cc/download)
### File System Setup
Taking Solr 8 as an example, first, extract Solr and NSSM to the following path on your file system (adapt paths as necessary).
```
C:\Program Files\solr-5.0.0
C:\Program Files\nssm
```
Setting up Solr as a service
On the command line, type the following:
```
"c:\Program Files\nssm\win64\nssm" install solr
```
Fill out the path to the **solr.cmd** script, and the startup directory should be filled in automatically. Don’t forget to input the **-f (foreground)** parameter so that NSSM can kill it when it needs to be stopped or restarted.
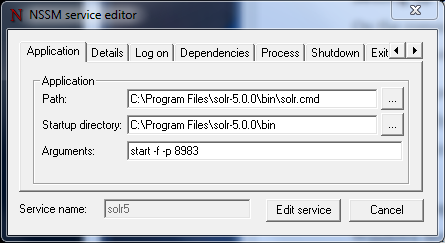
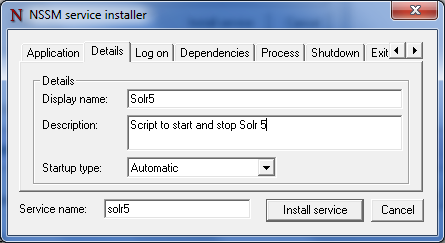
The following step is optional, but I prefer having a clean and descriptive name in my Windows Service Manager. Under the details tab, fill out the Display name and Description.
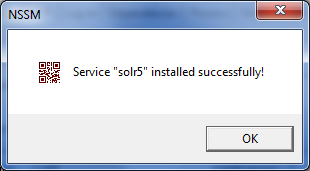
Click on Install service.
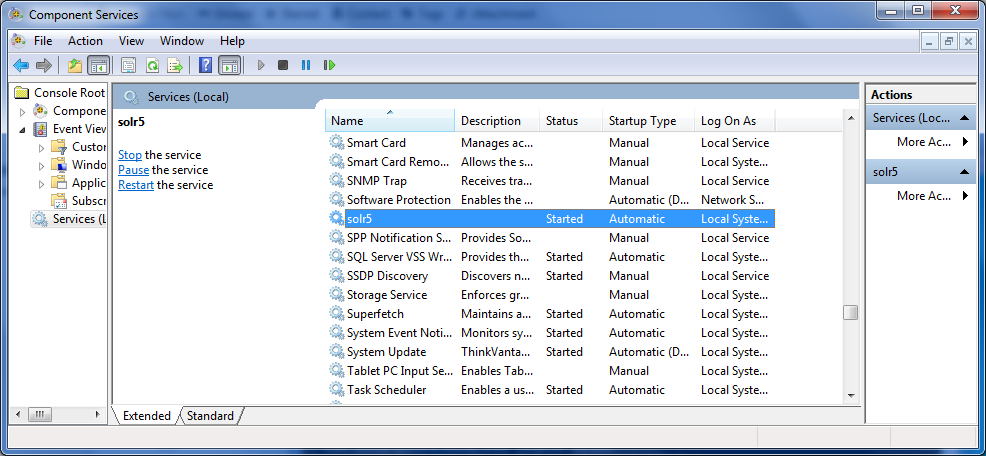
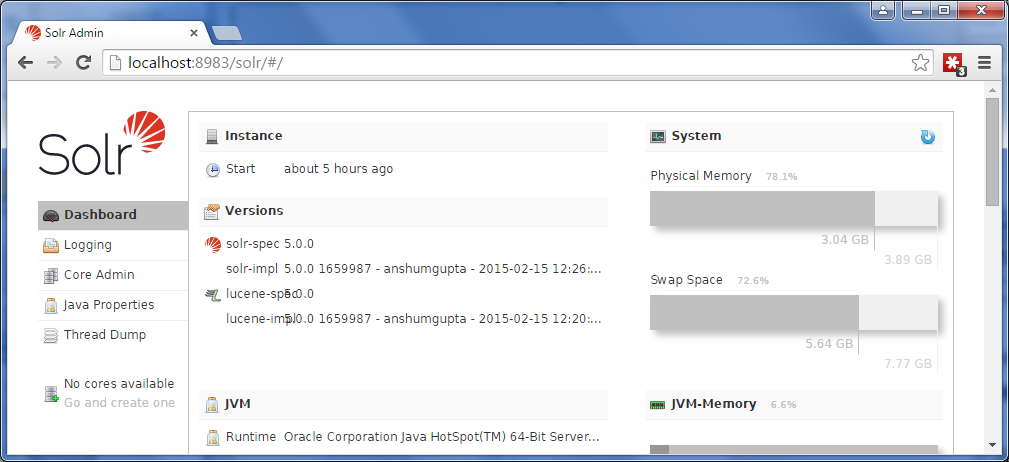
Check that the service is running.
Go to your favorite web browser and make sure Solr is up and running.
### Conclusion
I spent a few hours finding this simple solution, and I hope this tutorial will help you set up Solr as a Microsoft Windows service in no time. I invite you to view the solr.cmd file content to find the parameters that will help you customize your Solr setup. For instance, while looking inside this file, I realized there I needed to add the -f parameter to run Solr in the foreground. That was key to get it running the way I needed it.
# OWASP
# RoadMap Based on 2017
#### 1. **Awareness and Training**
- **Objective:** educate all stakeholders about web security risks.
- **Actions:**
- Conduct training sessions for developers, testers, and management on the OWASP Top 10.
- Create awareness programs to highlight the importance of secure coding practices.
#### 2. **Risk Assessment**
- **Objective:** Identify and assess the specific risks to your applications.
- **Actions:**
- Perform a risk assessment to understand the unique threat landscape of your organization.
- Prioritize risks based on the OWASP Top 10 and your specific business context.
#### 3. **Secure Development Lifecycle (SDLC) Integration**
- **Objective:** Incorporate security into every phase of the software development lifecycle.
- **Actions:**
- Implement security requirements in the design phase.
- Use threat modeling to identify potential vulnerabilities early in the development process.
- Integrate security testing (SAST, DAST) into CI/CD pipelines.
#### 4. **Addressing OWASP Top 10 Risks**
- **Objective:** Mitigate the risks identified in the OWASP Top 10.
- **Actions:**
- **A1:2017 - Injection:** Use parameterized queries and ORM tools to prevent injection attacks.
- **A2:2017 - Broken Authentication:** Implement multi-factor authentication and secure session management.
- **A3:2017 - Sensitive Data Exposure:** Encrypt sensitive data in transit and at rest; use strong cryptographic practices.
- **A4:2017 - XML External Entities (XXE):** Disable DTD processing and validate XML inputs.
- **A5:2017 - Broken Access Control:** Enforce strict access controls and regularly review permissions.
- **A6:2017 - Security Misconfiguration:** Regularly audit configurations and apply security hardening practices.
- **A7:2017 - Cross-Site Scripting (XSS):** Sanitize and encode user inputs; implement Content Security Policy (CSP).
- **A8:2017 - Insecure Deserialization:** Avoid deserializing untrusted data; implement integrity checks.
- **A9:2017 - Using Components with Known Vulnerabilities:** Maintain an inventory of components; regularly update and patch.
- **A10:2017 - Insufficient Logging & Monitoring:** Implement comprehensive logging and monitoring; establish incident response plans.
#### 5. **Testing and Validation**
- **Objective:** Ensure that security measures are effective.
- **Actions:**
- Conduct regular security testing (penetration testing, vulnerability scanning).
- Use automated tools to continuously monitor for vulnerabilities.
- Perform code reviews focusing on security issues.
#### 6. **Incident Response Planning**
- **Objective:** Prepare for potential security incidents.
- **Actions:**
- Develop and document an incident response plan.
- Conduct drills and simulations to test the effectiveness of the response plan.
- Establish communication protocols for reporting and managing incidents.
#### 7. **Continuous Improvement**
- **Objective:** Evolve security practices based on new threats and vulnerabilities.
- **Actions:**
- Stay updated with the latest security trends and OWASP updates.
- Regularly review and update security policies and practices.
- Foster a culture of security within the organization, encouraging feedback and improvement.
#### 8. **Compliance and Governance**
- **Objective:** Ensure adherence to relevant regulations and standards.
- **Actions:**
- Identify applicable compliance requirements (e.g., GDPR, PCI DSS).
- Implement necessary controls to meet compliance standards.
- Conduct regular audits to ensure compliance and identify gaps.
# Introduction
#### **CISSP (certified information System Security Professional)**
**Vision:** Inspire a safe and secure cyber world.
**Mission:** Provide industry & networking standard information to members. (ISC2) International standards for information security.
# Installing Ubuntu WSL in Window Server 2019
Open Powershell in Administrator mode the directory would be C:\\Users\\Administrator
```
Invoke-WebRequest -Uri https://aka.ms/wsl-ubuntu-1804 -OutFile ubuntu.appx -UseBasicParsing
```
Once download
Rename ububtu.appx to ubuntu.zip
Extract ubuntu.zip in same place
Back to power shell
```
$userenv = [System.Environment]::GetEnvironmentVariable("path","user")
```
```
[System.Environment]::SetEnvironmentVariable("PATH", $userenv +";C:\Users\Administrator\ubuntu","User")
```
Once done open the CMD in Administrator mode.
```
cd "C:\Users\Administrator\ubuntu"
```
```
ububtu1804.exe
```
It will ask for a username and password to provide the information, and you are done.
Don't forget to update and upgrade the server.